SSH is one of those tools that once you learn you wonder how you ever lived without it. Today, we'll cover some tricks to pimp your SSH workflow using the ~/.ssh/config file.
Getting Started with SSH
SSH (Secure Socket sHell) provides a secure way to access another computer. The most common use case for this will be a simple SSH connection from system A -> system B thus:
ssh admin@systemb.domain.com -p 22222Under the hood SSH initiates a remote login to systemb on port 22222 (default SSH port is 22) using the username specified, in this case admin. By default SSH will use the username from your local system, so if this matches the user@ portion is not required.
SSH config file
The SSH config file is a way to capture host specific information saving you from having to specify this on every connection. In it's simplest form this file usually lives at ~/.ssh/config. Using our example from above:
Host systemb
  Hostname systemb.domain.com
  User admin
  Port 22222
With the above in our ~/.ssh/config file we can now perform the same connection as before with:
ssh systembMultiple hops
SSH'ing from one host to another is useful but a decent security model might involve a hardened SSH bastion host.
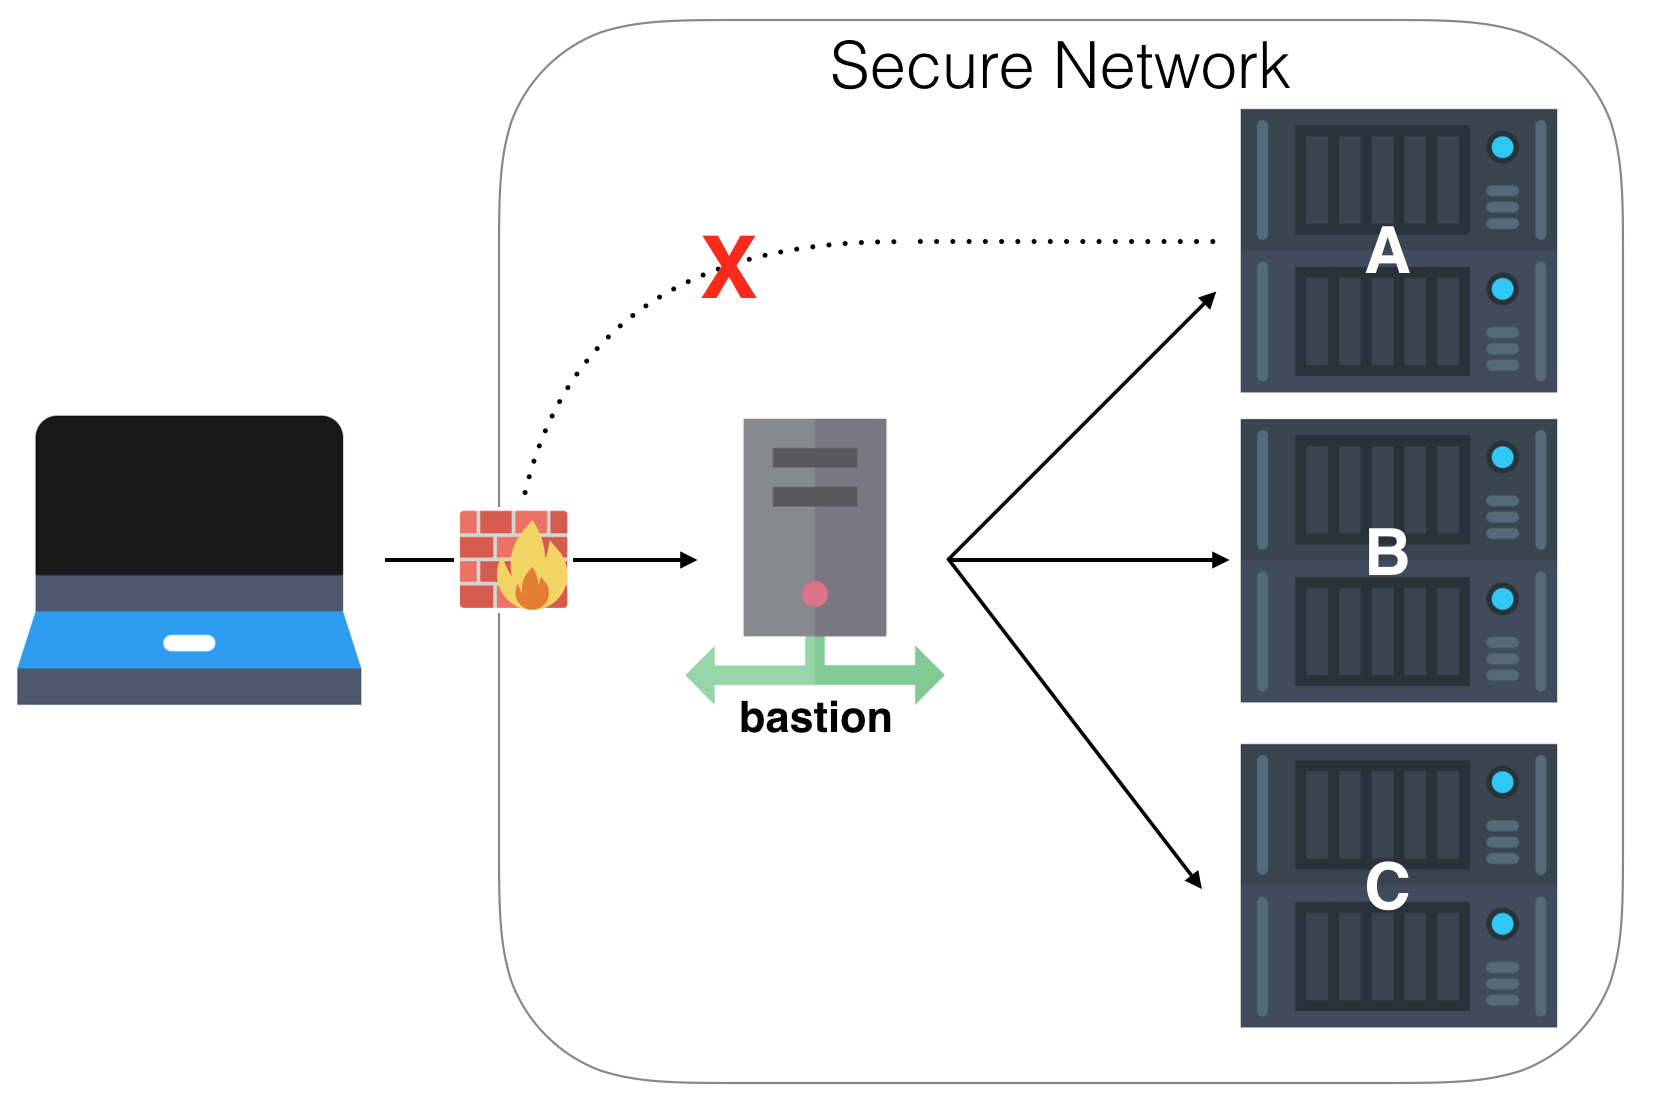
Consider the following diagram. In this scenario you'd like to SSH from your laptop to server A. For security reasons it might not be a good idea to open up server A directly the internet (this is almost certainly true).

This is where a bastion host (sometimes referred to as a jump host) comes into it's own. It's only job is to securely handle SSH traffic and is a single entry point to your network. It might be a good idea to ensure this box is only accessible over a VPN and / or with 2FA depending on your paranoia levels. It means you can still have remote access whilst also making it many times more difficult for a remote attacker to penetrate a vulnerable system.
Using our SSH config file we can easily make the bastion box appear transparent to the end user like so:
Host bastion
  Hostname bastion.domain.com
  Port 2222 # a non-standard port is a good idea
  User ironicbadger

Host servera
  Hostname servera.lan.local
  User servera-user
  ProxyCommand ssh bastion -W %h:%p
To connect to servera execute ssh servera and the rest will happen for you based on the config file. Pretty neat.
The ingredient that allows us to transparently hop the bastion box is:
ProxyCommand ssh bastion -W %h:%p Specifically the -W parameter. The SSH manpage says of -W host:port, "requests that standard input and output on the client be forwarded to host on port over the secure channel". The means, all the traffic is forwarded via the specified host transparently. It is possible to use netcat for the same purpose but not relying on an external binary is the smarter move if you can.
Summary
Using this technique it becomes possible to jump through multiple hosts, multiple times with one command.
For example, I have a bastion host on a cloud based VPS which I can connect to from anywhere (only works via a VPN, but that's another post) whilst access into my home network is limited to one external IP only in the firewall at the edge of my LAN. The traffic between the cloud host and my LANs internal bastion host also runs across a VPN tunnel but to me, this is transparent thanks to SSH config.
Using these techniques you should be able to build a secure public facing entry point into your network whilst knowing your LAN is safe.
Extra Tip: HTTP Proxy Workaround
Another useful trick I use to tunnel out from behind restrictive proxies is using corkscrew.
Host bastion
  User some-user
  Port 2222
  Hostname bastion.domain.com
  ProxyCommand corkscrew proxy.company.com 8080 %h %p
For bonus points, route this over port 443 so that most outbound proxies can't tell the difference and thus allow the traffic out.
