AUFS and SnapRAID is a completely free drive pooling and drive fault tolerance setup. Its hugely powerful but not simple to setup for a newbie. This post will explain how to set them up and build a high performance NAS server for your home using all free and open source software. What is AUFS? What’s SnapRAID? Don’t worry, all will be explained…
As you may know, I’ve been an unRAID user for some 3+ years. I’ve decided to move from unRAID to increase the freedom and control I have over my file server. This post is in part, a chronicle of switch from unRAID to SnapRAID.
I used Arch Linux as the OS here, but most of the configuration files posted here will drop quite happily into other Linux distros. The major exception will be mounting AUFS via systemd as not all distros use systemd yet. With that in mind, let’s begin.
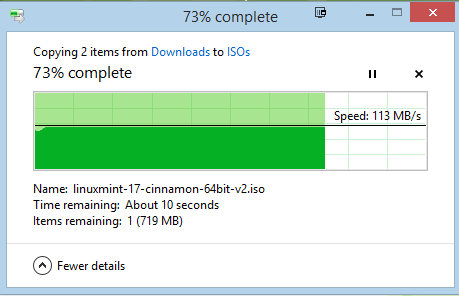
Copying over gigabit ethernet from Windows to AUFS via SMB. Like the look of these speeds? Read on…
Back up anything you care about!
Before you start you’re going to want to BACK UP any important data on your unRAID. It goes without saying that during this process your data will not be protected by parity and is at risk. I am not responsible for any data loss incurred during this process.
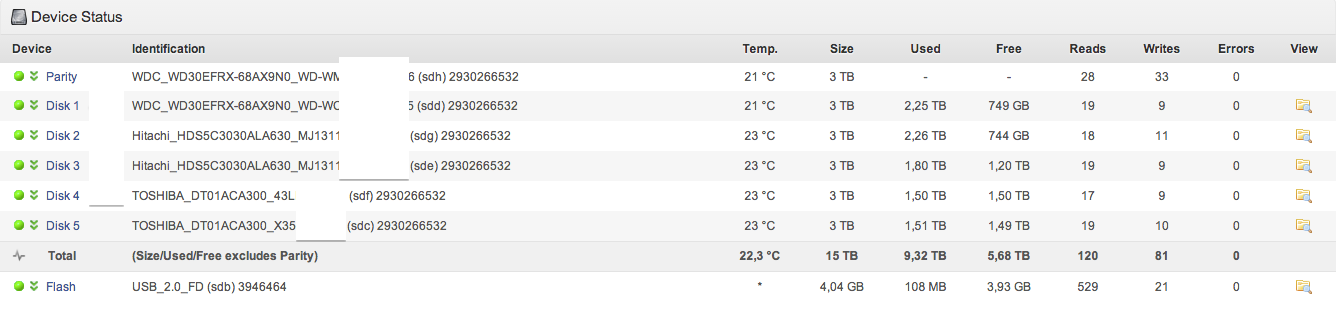
I am moving away from unRAID and in order to keep track of which drive held data and which drive was parity etc I took a screenshot of my drive config page. I suggest you do the same.
Once you’ve got a mental picture of which drive goes where you’ll want to start preparing to move everything across. At this point, I installed Arch Linux to an SSD I had lying around.
Transferring your data
The process of moving away from unRAID involves converting each of your drives from reiserfs to a somewhat more up to date and faster filesystem. There is some debate on this but based on results of testing XFS is marginally the fastest for lots of large files, such as media. Ext4 or BTRFS will also do you fine though but I chose XFS. This is a tedious process and took me about 3 days of constant transferring it total. One by one disk to disk transfer of 9tb of data takes a while.
-
Find the parity drive (or an empty drive), create a new GPT and format it.
pacman -S gptfdisk gdisk /dev/disk/by-id/ata-blahblah gdisk command: o
-
Mount your first unraid disk that you want to empty.
mkdir /mnt/unraid mount /dev/disk/by-id/ata-blah-part1 /mnt/unraid
-
Use rsync to copy all the data from /mnt/unraid to /mnt/disk1. Be careful of syntax here, it must include all slashes at the end of file paths.
rsync -av --progress /mnt/unraid/ /mnt/disk1/
-
Repeat steps 1 – 3 until you’re done, incrementing the /mnt/disk# each time (e.g. /mnt/disk3). A good way to check on progress is by using the onscreen display rsync gives you, but also by switching to a different console ( alt + f2 ) and typing
df -hand manually comparing with your eyes. -
Mount each drive in your
fstabusing it’s UUID. First, grab the UUID of each drive from the ‘blkid’ command, then pop it into your fstab until it looks like this. (This is an example of part of my fstab). You should reboot and check all your drives mount correctly before we move on.SnapRAID Disks
/dev/disk/by-id/ata-Hitachi_HDS5C3030ALA630_MJ1311YNG4GE8A-part1 /mnt/disk1 xfs defaults 0 2 /dev/disk/by-id/ata-Hitachi_HDS5C3030ALA630_MJ1311YNG5SD3A-part1 /mnt/disk2 xfs defaults 0 2 /dev/disk/by-id/ata-TOSHIBA_DT01ACA300_43LNPGSGS-part1 /mnt/disk3 xfs defaults 0 2 /dev/disk/by-id/ata-WDC_WD30EFRX-68AX9N0_WD-WCC1T0632015-part1 /mnt/disk4 xfs defaults 0 2 /dev/disk/by-id/ata-WDC_WD30EFRX-68AX9N0_WD-WMC1T0074096-part1 /mnt/disk5 xfs defaults 0 2
SnapRAID Parity Disks
/dev/disk/by-id/ata-TOSHIBA_DT01ACA300_X3544DGKS-part1 /mnt/parity xfs defaults 0 2
Now you’re done here, we can move onto SnapRAID and AUFS configuration.
AUFS on Arch
AUFS (Another Union File System) allows you to pool drives providing a single useful mount point across multiple drives. For it work you’ll need an AUFS compatible kernel, which is provided in the AUR. I’ll walk you through the steps to compile and install it on an Arch system.
-
Download the tarball from the AUR for linux-aufs_friendly. Unpack the tarball and change into the directory.
wget https://aur.archlinux.org/packages/li/linux-aufs_friendly/linux-aufs_friendly.tar.gz tar -xvf linux-aufs_friendly.tar.gz cd linux-aufs_friendly
-
Make sure your
/etc/makepkg.confis configured as per my arch post install instructions post for the number of CPU cores you have. -
Now we’re going to compile an AUFS compatible kernel using the tarball from AUR above. It can take 40+ minutes and will tax your system hard. Go make a cup of tea. Then install the created package.
su user
-
Update grub and reboot.
grub-mkconfig -o /boot/grub/grub.cfg reboot
-
Use the steps from above to download, compile and install aufs3 from AUR.
wget https://aur.archlinux.org/packages/au/aufs3/aufs3.tar.gz tar -xvf aufs3.tar.gz cd aufs3 su user makepkg -s
-
Create a systemd service to automount your AUFS mount after waiting for your other drives to be successfully mounted. I had issues with using fstab for AUFS mount, and found the systemd service much more reliable. Here’s an example systemd file for you to edit to match your setup.
/etc/systemd/system/mnt-aufs.mount
[Unit] Description = AUFS disk Requires = mnt-disk1.mount Requires = mnt-disk2.mount Requires = mnt-disk3.mount Requires = mnt-disk4.mount Requires = mnt-disk5.mount After = mnt-disk1.mount After = mnt-disk2.mount After = mnt-disk3.mount After = mnt-disk4.mount After = mnt-disk5.mount
[Mount] What = none Where = /mnt/aufs Type = aufs Options = br:/mnt/disk1=rw:/mnt/disk2=rw:/mnt/disk3=rw:/mnt/disk4=rw:/mnt/disk5=rw,sum,create=pmfs
[Install] WantedBy = multi-user.target
NB (thanks to commenter Kryspy) – [With AUFS] If using the “mfs” switch in your AUFS config it would choose the disk with the most amount of free-space. With the pmfs switch it will attempt to write to the parent disk where the folder exists first before writing to another disk.
-
Once you’ve created your systemd file, you’ll want to reload the systemd daemon and then start and enable the service.
systemctl daemon-reload systemctl start mnt-aufs.mount systemctl enable mnt-aufs.mount
-
Issue
df -hto check that your AUFS mount is working correctly. Reboot and check it is working correctly, then rejoice when it does.

You have just setup AUFS. Congratulations!
SnapRAID configuration
I’m going to separate the SnapRAID configuration from the AUFS configuration into a new post.
SnapRAID configuration is supremely simple. One config file is all you need. First, install snapraid from AUR using yaourt, packer or makepkg.
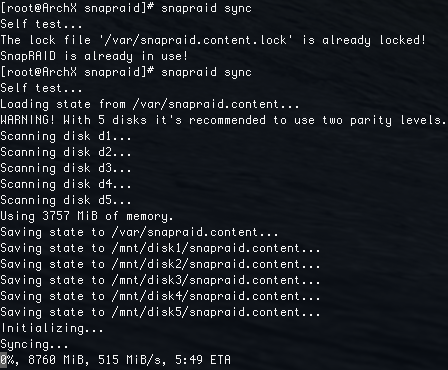
Initial parity sync speed. Completed in 6hrs and 4 mins…
Here is my /etc/snapraid.conf file, edit it as you see fit – it is fairly self explanatory but you do need to make sure each drive is individually mounted in /etc/fstab.
# Example configuration for snapraid

# Defines the file to use as parity storage
# It must NOT be in a data disk
# Format: "parity FILE_PATH"
parity /mnt/parity1/snapraid.parity

# Defines the files to use as content list
# You can use multiple specification to store more copies
# You must have least one copy for each parity file plus one. Some more don't hurt
# They can be in the disks used for data, parity or boot,
# but each file must be in a different disk
# Format: "content FILE_PATH"
content /var/snapraid.content
content /mnt/disk1/.snapraid.content
content /mnt/disk2/.snapraid.content

# Defines the data disks to use
# The order is relevant for parity, do not change it
# Format: "disk DISK_NAME DISK_MOUNT_POINT"
disk d1 /mnt/disk1/
disk d2 /mnt/disk2/
disk d3 /mnt/disk3/
disk d4 /mnt/disk4/
disk d5 /mnt/disk5/

# Excludes hidden files and directories (uncomment to enable).
#nohidden

# Defines files and directories to exclude
# Remember that all the paths are relative at the mount points
# Format: "exclude FILE"
# Format: "exclude DIR/"
# Format: "exclude /PATH/FILE"
# Format: "exclude /PATH/DIR/"
exclude *.unrecoverable
exclude /tmp/
exclude /lost+found/
exclude *.!sync
exclude .AppleDouble
exclude ._AppleDouble
exclude .DS_Store
exclude ._.DS_Store
exclude .Thumbs.db
exclude .fseventsd
exclude .Spotlight-V100
exclude .TemporaryItems
exclude .Trashes
exclude .AppleDB
The Other Stuff – Spin down, email notifications etc…
This will now not be included in this post, I think it belongs on its own so as to be separate from the AUFS knowledge.